| The following No Great War page is under construction.
Please do not edit or alter this article in any way while this template is active. All unauthorized edits may be reverted on the admin's discretion. Propose any changes to the talk page. |
| |||||||||||||||||||||||||||||||||
| Land Battles |
|---|
| Caporetto • 1st Isonzo • Garda • Valdagno • 2nd Isonzo • Asiago • Venice |
| Naval Battles |
|---|
| 1st Gulf of Venice • 2nd Gulf of Venice • Parenzo • Trieste • 3rd Gulf of Venice • Manfredonia |
Prelude[]
The cause of the war lies in the Italian irredentist movement. Along the border between Italy and Austria-Hungary, there are pockets of territory under the jurisdiction of the Austro-Hungarian Empire, but spoke Italian. As such, Italy saw them as Italians and their homes and land as their territory.
In December 1914, Italy decided to do something about it. Italy sent Austria and ultimatum, either hand them over or it will be taken by force. The deadline was set for February 1, 1915.
Through January of 1915, several attempts were made to either compromise or get either side to back down. All failed. Germany, an ally of both, proposed a last-minute compromise of having Austria cede only some of the disputed territory. In the end, every try was in vain. On February 1, 1915, Italy declared war.
The War[]
Initial Advances[]
Within hours of the declaration of war, the Italian Army launched a broad attack all across the border. They made decent advances but a combination of the mountainous terrain and the ferocity of the defenders caused the attack to bog down.
The Italians manage to capture the town of Caporetto in the initial attack. Due to its position, the Austro-Hungarian army made retaking it a top priority. Several ferocious attacks were made on the Italian positions in the following, but little headway was achieved.
By June, 1915, a number of assaults on the position outside Caporetto pushed the lines there back, making the city the tip of an increasingly indefensible salient. The Italian army was forced to abandon the town in early July.
Problems in the ranks[]
After only a few months of conflict, the weaknesses of the two nations began showing. Both suffered mainly from a lack of discipline and morale, as well as incompetence in the High Commands.
Austria-Hungary[]
Austria-Hungary's problems reflected those of the preceding Austrian Empire: problems with the minorities. Tensions within the Empire were high even before the outbreak of hostilities, and were only increasing. The only thing stopping many from revolting is Archduke Franz Ferdinand, heir to the Austrian throne, and his plans to federalize the Empire, giving the minorities some sort of voice.
This, though, did little to solve the problems within the army, which revolved around a lack of discipline. Austrian attempts to reform the army (preferably along German standards) were blocked by the Hungarians, fearing a loss of control. Nevertheless, Austria-Hungary held a numerical superiority to the Italian army, who was arguably in worse shape than Austria.
Austria-Hungary's greatest advantage laid in the Navy. While not having the amount of cruisers Italy did, it held a greater number of battleships, both dreadnoughts and pre-dreadnoughts (many of which were of higher quality than their Italian counterparts), and destroyers. Austria also had five submarines to Italy's none.
Italy[]
Like Austria, Italy suffered from low morale and a lack of effective leadership. Much of the blame can be placed on the Italian Chief-of-Staff, Luigi Cardona.
Cardona believed a Napoleonic-style offensive into Trentino and Istria would carry the day. He did not take into account that the introduction of modern artillery and machine guns rendered such tactics suicidal.
Following a mostly successful push into Austrian territory near the Isonzo River, he decided to launch more assaults on the area. But as the Austria dug in more, and the Italians attacked more, the losses began to mount. Italian troops began to feel the Isonzo campaign was hopeless, despite the High Commands assurances. Morale plummeted with each failed assault, and the harsh discipline inflicted on the troops only made matters worse. Propaganda did little to ease them.
Frustrated by the lack of success, Cardona grew a habit of firing commanders almost daily, mostly because he felt they doubted him (which many did). Week-to-week, the Italian Command was never the same. Following the Austrian breakthrough in March, 1916, he insisted on defending the indefensible Venice. Finally having enough of him, King Emmanuel III personally fired him. His replacement proved to be even more incompetent, but nonetheless realized Venice could not be held. The loss of such a culturally significant city proved to be the breaking point for many troops, and desertions became commonplace in the closing weeks.
The Italian troops suffered a large drop in morale as the months wore on: they weren't allowed to enter theaters or bars whilst on leave. Access to brothels and alcohol were cracked down upon. Italy's industry also began to prove to be incapable of supporting such a war effort, while that of Austria-Hungary was able to keep up. Eventually, most of the steel was redirected to the shipyards to hurry construction on the Italian battleships, as the Austro-Hungarian navy also proved to outmatch it.
Digging In[]
After the Battle of Caporetto, both sides tried to consolidate their holdings. Across the front both sides dug trenches as machine guns proved their deadly worth. Before long, though, they become disgusting quagmires, full of mud and rats.
Between the trenches, lies what could be up to hundreds of yards of crater spotted earth. On opposing sides, snipers, armed with specail rifles equipped with scopes, peer across the empty vast and at the enemy. When they find their target, it never knows what hits them.
Soldiers are quick to despise trench warfare, and are eager to move. Italy launches an assault on the Austrians on the Isonzo River. After a fifteen mile retreat, the attack is stopped. Seeing this as a possible weak spot, more are concentrated in this area. But they weaken other, more vulnerable spots.
Clash on the High Seas[]
At the outbreak of the war, the navies were mostly evenly matched. Though while Italy had more cruisers and destroyers, Austria-Hungary had more battleships at 16, three of which were dreadnoughts with a fourth nearing completion. Italy had two completed and two nearing their own completion. But the Austrians had the advantage of five submarines to Italy's none.
Days after the wars' outbreak, both fleets left port to meet the other, they engage on February 3. In the ensuing battle, the Italians lose the pre-dreadnought Napoli and the cruiser Amalfi. The Austrians lose no ships and only a cruiser is damaged.
Engagements on the water came a lot more sporadic than those on land, despite major naval bases, Trieste and Venice, being less than sixty miles apart. This is mainly due to the shortage of coal available to the navies. But as the war drew on, both, especially the Italians became impatient. Willing to risk their capital ships, they would go to win several battles, including the Second battle of the Gulf of Venice and the Battle of Parenzo.
The success of the Austro-Hungarian Navy can be attributed to a few factors. Austria held ships that were superior to those of Italy, first. Although Italy was able to field more cruisers and destroyers, Austria sent more capital ships. Surprisingly, the semi-dreadnoughts of the Radetzky class ships proved effective combat ships. Although slower and less armed than Austria's Tegetthoff class dreadnoughts, they required less coal, allowing them to operate longer in the midst of the shortage during the war. The ships proved useful during the Battle of Parenzo, where two members of the class held off an attacking Italian fleet long enough for reinforcements to arrive.
The other factor was Archduke Franz Ferdinand himself. As a strong supporter of the Navy, he advocated a more active role in the war than the admirals had desired. But his support showed to be not misplaced as the Austrian Navy won decisive victories in the Battles of the Gulf of Venice and Manfredonia.
Isonzo[]
Following their failure to hold Caporetto, the Italy re-concentrates its forces farther south, near the mouth of the Isonzo River. The naval base at Trieste lies twenty miles behind the lines, a tempting target. Should they take Trieste, then the Austro-Hungarian Navy would have to relocate to Pula, forty miles south and leading to a slower naval response.
On the thirteenth of July, ten days after the fall of Caporetto, Italy assails the Austrian lines. Initially they are fended off, but repeated attacks and unrelenting artillery barrages eventually lead to a withdrawal.
What had been planned to be a short advance to the rear turned into a retreat. The lines falls back fifteen miles before they establish new defenses, centered around the town of Gorizia.
Finally convinced they found a weak section of the Austrian line, the Isonzo evolved into the goal of the Italian campaign: take the Istrian Peninsula, then wheel north and bring Vienna under their guns.
"Look to the sky!"[]
For the first time, airplanes are used in battle. For the beginning months, the air arms of the two warring nations, scarcely 150 operable airplanes between them, let the skies become almost neutral territory: when confronted, they went their separate ways. Reconnaissance from them proved invaluable, and would lead to some of the wars successful offensives.
In June, though, the peacefulness of the air was destroyed. The rear-seat observer of an Austrian pilot killed an Italian counterpart with a shotgun he took with him. In response, pilots and observers on both sides armed themselves, and a new theater of war was opened.
German Assistance[]
Due to being an ally of both Italy and Austria-Hungary, Germany was officially neutral in the war. This didn't stop volunteers from Germany joining Austria. Many felt the desire to aid their ethnic brethren in Austria, others were angry at the Italian aggression. Whatever their reason, between five and seven thousand Germans volunteered for Austria.
It wasn't all front line troops Austria-Hungary was receiving, a few generals pulled in leave time to aid Austria. Among these were Paul Von Hindenburg and Max Hoffman, two rising stars in the German army.
Initially, the German officers merely acted as aids: consulted when the Austrian and Hungarian generals planned an offensive. But as the war drew on, the Germans began taking a more active role. Eventually, by November, 1915, they were the one planning the moves for the army. While this displeased the Austro-Hungarian generals (the Hungarians in particular) they grudgingly accepted the Germans. The major victories for Austria during the war, such as the Asiago Offensive and the Battle of Venice, were the product of German strategy.
The Austro-Hungarians inability to properly plan and execute military strategies proved to be an underlining weakness as a result of the 1867 Compromise. It would only prove to further Franz Ferdinand's ambition to reorganize the Empire.
Garda Offensive[]
On the opposite flank of the front, near the three-way border with Switzerland, the Austrians have concentrated thousands of men. Mere days after the Italians are stopped at the Isonzo, the Garda Offensive is launched, named after the lake whose southern shore is their goal. The Italians in the area had a large portion of their contingent moved to aid those at the Isonzo River, and were outnumbered by the attackers.
By nightfall of the first day, the line had fallen back by a mile with the Italians haven't set up a defense. It continued the following days with similar success. In a panic, the Italians rushed in the reserves in an attempt to reinforce the line.
The first real resistance encountered was at Valdagno, well inside the pre-war Italian borders. The heavy defense put a stop to the Garda Offensive, who had mostly lost steam to its unmatched success. Valdagno would become the anchor of the new defensive line.
Breakthroughs[]
By late 1915, soldiers on both sides were becoming restless. Most had not moved since the start of the war, and the effects of the boredom were becoming apparent. With insubordination growing in the ranks, the Austrian generals come to the conclusion that they needed a breakthrough, and soon.
They settled on a two pronged attack: one from Asiago, the other from Gorizia, with the offensives name coming from the former. On November 13, guns all along the line open up, hundreds of them. Chemical and conventional shells pound the opposing trenches while the soldiers huddle in bunkers. In the midst of the bombardment, snipers scope out Italian machine gun nests, ranging shots allow them to zero in on the deadly weapons.
After four days, the Austrian officers order their men over the top. They rush the several hundred meters across the battered no-mans land. The Italians rush to defend. But within minutes, they're rushed by the approaching Austrian troops. Vicious hand-to-hand fighting ensues in the trenches. Eventually, they're overrun in Asiago and at the Isonzo.
Valdagno, which has held off a direct assault, is now threatened from behind. From their flank, and from a new attack in front, the city is forced to evacuate. With the front broken through, the Italian generals order a retreat.
Fall of Venice[]
Italian units rush to the rear, afraid of being cut off by the rapidly advancing Austrians. In early September, Udine falls, and Italian soldiers set up defenses in Venice, which is surrounded by October.
Advance through the city is slow, but the Austrians make slow headway. On the water, Kriegsmarine ships move dangerously close, risking running aground and become an easy target. The two-way assaults push the Italian defenders deeper into the increasingly ruined city.
The battle drags out for almost a month. Every canal, every block, and every street corner is fought for viciously. To the west, Austrian troops close in on Milan, which has had more time to prepare. A spider web network of trenches stretches for the city edge to the east, backed up by scores of heavy artillery. But it will never be tested by a direct attack.
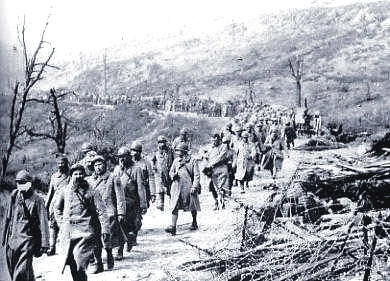
Shelled, demoralized, no chance of relief, and ammunition almost out, the 300 surviving Italian defenders surrender on March 8, 1915. Completing the 1-2 punch, the Italian navy is devastated while it sat at anchor in the Gulf of Manfredonia. The Kingdom of Italy decides to ask for peace on June 1.
End of the War[]
Peace negotiations began in Budapest on December 5. The Italian diplomats knew that they were in no position to make many demands, so they're single one was that the borders would revert to the pre-war boundaries. This was instantly rejected, Franz Joseph I even said, "They're not getting off that easy".
The Austrians countered with demanding billions of "krone"s worth of reparations, military restrictions, and being ceded territory equal to that of the Kingdom of Lombardy-Venetia at its 1815 borders. The orders infuriated the Italian diplomats, who asked to be adjourned for the day. Upon hearing the news via telegram, Italian King Emanuel III reportatly yelled, "Emanuel II fought for that land, I'll be damned if I let that Austrian take it!" In fact, the Austrian army had occupied over half of the demanded territory at that point.
After continued rejections, the Austrians tell that if all their demands aren't met, hostilities will resume. In no position to continue the war, the Italians cut their losses and agree. The Treaty of Budapest is signed on March 27, 1916.
| |||||||||||||||||